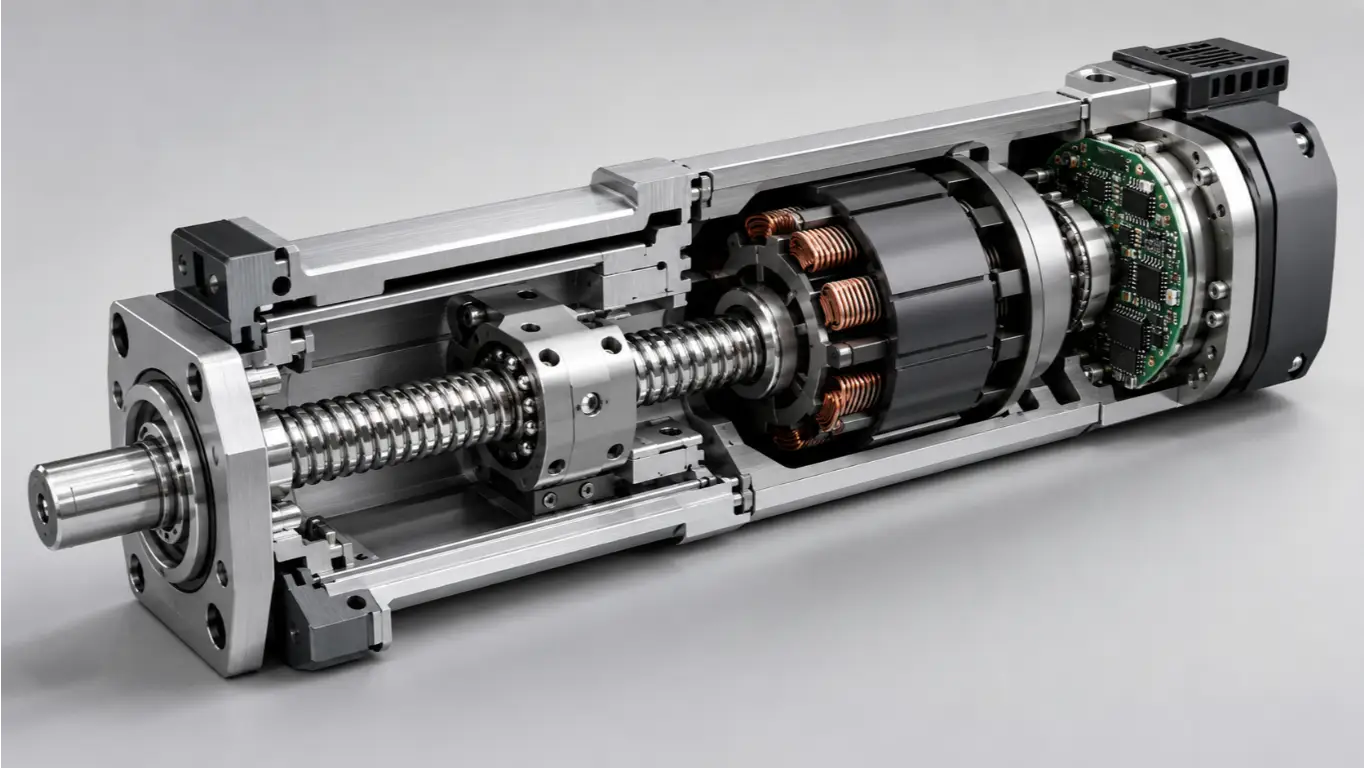
Linear Actuator Repair: A Practical Guide to Diagnosis, Fixing, and Deciding When to Replace
When a linear actuator stops working, the first reaction is rarely calm. Maybe it’s the lift column on a medical exam chair that won’t rise. Maybe it’s the push rod on a production line fixture that’s gone silent. Whatever the application, the equation is the same: equipment down, work piling up, and no clear answer on what to do next.
The good news is that most linear actuator failures follow predictable patterns. Many can be resolved without replacing the entire unit. This guide walks you through the full repair journey: recognizing symptoms, diagnosing root causes, attempting DIY fixes, knowing when to step back, and making the repair-or-replace call with actual numbers behind it.
Common Linear Actuator Failure Symptoms and Their Root Causes
A mechanic listens to the engine before opening the hood. Actuator repair works the same way — match what you observe to what’s likely broken underneath. Use the table below to zero in on your issue.
| Symptom | Likely Root Cause | Severity | First Check |
|---|---|---|---|
| Actuator won’t move at all | Dead power supply, blown motor winding, stuck limit switch, severed internal wiring | High | Apply 12V/24V directly to motor leads. If it moves, the problem is upstream in the controller or wiring |
| Grinding, clicking, or squealing noise | Dry lead screw, worn gear teeth, loose mounting hardware, failing bearing | Medium | Listen at the gearbox housing with a screwdriver against your ear. Rhythmic clicking = gear damage; continuous grinding = lack of lubrication |
| Jerky or unstable movement | Side loading, bent lead screw, worn nut, debris in the guide channel | Medium | Extend the actuator fully and check for visible wobble or rod deflection |
| Speed is inconsistent or too slow | Voltage sag under load, worn motor brushes, overloading beyond rated capacity | Medium | Measure voltage at the actuator under load. A drop of more than 10% from rated voltage means the power supply is undersized |
| Actuator overheats and shuts down | Duty cycle exceeded, overloaded, insufficient cooling, high ambient temperature | Medium-High | Let it cool for 20 minutes and retry. If it runs briefly then stops again, you’re overloading it or exceeding the duty cycle limit (typically 10–25%) |
| Cannot hold position under load | Worn lead screw nut (backlash), internal brake failure (if equipped), load exceeds static rating | Medium | Push against the actuator by hand when powered off. Visible movement without power means the nut or brake has excessive wear |
If your exact symptom doesn’t appear above, look for the closest match. Most failures fall into one of these six buckets, and the diagnostic logic in the next section covers paths for each.
DIY Troubleshooting: Step-by-Step Fixes for Common Issues
Here’s a reality check that shapes everything that follows: roughly 80% of linear actuator failures trace back to power or wiring issues, about 15% are mechanical, and only about 5% originate in the controller itself. Follow this sequence — electrical first, then mechanical, then control — and you’ll solve the majority of problems before reaching for the toolbox.
Power and Electrical Issues: The 80% Problem
Electrical failures are the most common and the most DIY-friendly. Start here before assuming the worst.
Step 1: Test the power supply. Use a multimeter set to DC voltage. Measure the power supply output with the actuator disconnected — you should see 12V or 24V DC, matching your actuator’s nameplate rating. Now measure again with the actuator connected and running. If voltage drops more than 10% under load, your power supply can’t deliver enough current. Replace it with one rated at least 20% above the actuator’s maximum current draw.
Step 2: Bypass the controller. Disconnect the actuator from the controller and apply 12V/24V directly to the two motor wires. Positive to red, negative to black extends the actuator; reverse polarity to retract. If the actuator moves normally, the problem is in your controller or wiring, not the actuator itself. This single test saves hours of unnecessary disassembly.
Step 3: Check the motor windings. Set your multimeter to resistance (Ω). A healthy DC motor typically reads between 0.5Ω and 50Ω depending on the model. Zero resistance means the windings have shorted internally — the motor is burnt and needs replacement. Infinite resistance (open circuit) means a broken internal connection, often at the brush-commutator interface. Either way, the motor is done.
If the actuator overheated and stopped, you’re likely dealing with thermal protection. Most actuators have a built-in thermal switch that trips around 80–100°C. Wait 15–30 minutes for it to cool and reset, then test again. If it trips repeatedly, you’re exceeding the duty cycle or overloading it.
Mechanical Issues: Noise, Binding, and Wear
Mechanical problems announce themselves through sound and feel. Learning to read these signals lets you separate a five-minute fix from a terminal diagnosis.
Diagnose by sound. A dry, scratchy sound during movement means the lead screw needs lubrication. Apply lithium-based grease to the screw — never WD-40. WD-40 is a water-displacing solvent that strips existing grease and accelerates wear. A rhythmic clicking or thumping, especially under load, points to damaged gear teeth. A metallic rattling usually means loose mounting bolts or a worn coupling.
Lubrication is cheap insurance. Lead screws should be greased every 500 operating hours or quarterly, whichever comes first. Guide rails take light machine oil. POM (polyoxymethylene) plastic gears — common in quieter, longer-lasting actuators — need far less lubrication than metal gears and inherently run at under 50dB. Metal gear trains typically hit 65dB or more.
Check alignment. This is the silent killer of actuators. If the actuator rod and the load aren’t moving in a straight line, you’re applying side load. Side load destroys bearings, bends lead screws, and accelerates nut wear exponentially. With the actuator extended, sight down the rod from the mounting end. Any visible deflection or angle means you need to realign the mounting points or add a rod-end coupler that permits slight angular freedom.
Assess wear. A lead screw nut with more than 1mm of axial play is past its service life. Gear teeth that appear pointed or have visible pits on the contact surface need replacement. These are quantitative checks — don’t guess based on age alone.
Control and Signal Problems: When the Brain Fails
Control issues are the hardest to diagnose without specialized equipment, but a few basic checks cover most scenarios.
First, power-cycle the controller. Unplug it, wait 30 seconds, plug it back in. Software deadlocks in the controller firmware happen — this rules them out for free.
If only one direction works (extends but doesn’t retract, or vice versa), suspect a stuck limit switch or a blown MOSFET on the controller’s H-bridge. Test the limit switches by manually triggering them and listening for a click. If one doesn’t click, it’s jammed. If both limit switches work but the actuator still won’t reverse, the controller’s output stage is likely damaged.
For multi-actuator systems where one unit lags behind others, check cable lengths first. In a 24V system, every 10 meters of cable adds roughly 0.5–1V of voltage drop. Uneven cable runs cause uneven performance — match them within 10% length tolerance.
When DIY Isn’t Enough: Signs You Need Professional Repair
DIY troubleshooting has hard limits. Crossing them risks personal injury, cascading component damage, and voiding any remaining warranty. Here are five stop signs — when you hit one, put down the tools.
Stop Sign 1: You smell burning. A sharp, chemical odor — like melted plastic or nail polish remover — means the motor winding insulation has overheated and decomposed. This is the phenolic resin in the enamel wire coating breaking down. The motor is irreversibly damaged. Continuing to power it risks a short circuit that can take out the controller too.
Stop Sign 2: The lead screw is visibly bent. Roll the screw on a flat surface. If you can see daylight under it at any point, or the gap exceeds about 0.5mm, the screw cannot be straightened to factory spec. Running a bent screw through the nut will destroy both components.
Stop Sign 3: Gear teeth are broken or missing. Fragments of broken gear teeth floating inside the housing can lodge in other components and cause a cascade failure. If you find metal or plastic debris when you open the housing, the gearbox needs a full rebuild — not a patch job.
Stop Sign 4: The controller circuit board shows visible damage. Burned spots, bulging capacitors, or cracked solder joints mean the controller needs board-level repair. Unless you have electronics repair experience, this is a professional job — mains voltages may be present even when disconnected.
Stop Sign 5: The actuator is still under warranty. Most industrial actuators have a tamper-evident seal — a sticker or paint mark across the housing seam. Breaking it voids the warranty. If the unit is still covered, contact the manufacturer first. A free replacement beats any DIY fix.
Repair or Replace? A Practical Decision Framework
Once you’ve identified the problem — or hit a stop sign — the next question is whether to repair or replace. This section gives you a structured way to answer it, with real numbers instead of gut feelings.
The starting point: 50% rule. If the estimated repair cost exceeds 50% of a new unit’s price, replacement is usually the smarter move. But this is a guideline, not a scripture. The full decision also depends on damage severity and how much life the repaired actuator would have left.
Understanding the Real Costs: Repair vs. Replacement
Here’s what you’re actually looking at, based on industry repair cost data:
| Repair Type | Typical Cost Range | New Unit Cost (Comparable Spec) | Breakeven at 50% Rule |
|---|---|---|---|
| Minor (lubrication, wiring, switch replacement) | $20–$100 | $100–$800 | Almost always repair |
| Motor or gear replacement | $120–$450 | $200–$1,500 | Repair if unit is mid-range or higher |
| Multi-component overhaul | $400–$900 | $500–$2,500 | Evaluate carefully — age matters |
| Industrial rebuild (full strip, recondition) | $800–$1,800 | $1,500–$3,000+ | Repair for high-end units only |
Labor rates for actuator repair typically run $75–$150 per hour, with most jobs taking 1–3 hours. Parts account for 30–60% of the total bill.
One cost that doesn’t appear on any invoice: downtime. If a production line is stopped waiting for a repair that takes two weeks, the lost output may far exceed the price difference between repair and replacement. Factor this in honestly.
Assessing Damage Severity: A Scoring System
Cost alone doesn’t tell the whole story. A cheap repair on a badly worn actuator is money wasted — it’ll fail again soon. Score your actuator on these three dimensions:
1. Core component condition (1–5): Motor windings test normal (1). Minor brush wear or slight gear polishing (2–3). Visible gear pitting, motor overheating history, or lead screw scoring (4–5).
2. Recoverable performance after repair (1–5): Expect full speed/force restoration (1). Expect ~80% of original performance — acceptable for non-critical use (2–3). The actuator will run but with degraded precision or reduced load capacity (4–5).
3. Failure history (1–5): First failure in the actuator’s life (1). One or two prior issues, resolved (2–3). This is the third or fourth repair in 12 months — you’re chasing a pattern (4–5).
Total score: 3–6 → Repair. 7–10 → Proceed with caution — plan a replacement timeline even if you repair now. 11–15 → Replace.
The Repair-or-Replace Decision Matrix
Pull the cost and damage assessments together into a final call:
- Cost low (under 40% of new) + Damage score low (3–6): ✅ Repair. This is the sweet spot. Fix it yourself and get back to work.
- Cost low + Damage score high (11–15): ⚠️ Short-term repair + plan replacement. Fix it so the equipment runs today, but budget for a new actuator within six months. A worn-out unit repaired cheaply is a temporary bridge, not a permanent solution.
- Cost high (over 60% of new) + Damage score low: 🔍 Get a second opinion. At these numbers, ask a repair shop to quote before committing. If the unit is high-end or custom-sized and off-the-shelf replacements don’t exist, a rebuild may still make sense.
- Cost high + Damage score high: ❌ Replace. Don’t pour money into a dying actuator. The math doesn’t work, and the reliability won’t come back.
If the decision lands on replacement, focus your search on what actually extends service life this time around. Look for actuators rated for at least 30,000 cycles — roughly double the industry baseline. For indoor or medical applications, target noise levels under 50dB. POM non-metal gears consistently outlast metal equivalents in normal-duty use, and units that ship with individual test reports give you verified performance data before installation. When comparing quality linear actuators, prioritize documented cycle life and noise specs over marketing claims — the test data tells the real story.
One reliability pattern worth noting: if the same actuator has been repaired more than twice in the past 12 months, the failure rate is accelerating. Even if the current issue looks minor, the next failure is statistically closer than the last one was. At that point, replacement isn’t just cost-effective — it’s the only way to break the cycle of unplanned downtime.
How to Source Quality Replacement Parts and What to Look For
If you’ve decided to repair, you now need parts that won’t fail prematurely. The replacement parts market for linear actuators is fragmented — there are no universal standards, and quality varies dramatically.
Know exactly what you’re replacing. The five most commonly replaced components are motors, gear sets, lead screw nuts, limit switches, and controllers. Each has matching parameters that are non-negotiable: voltage must match exactly (0% tolerance for motors), thrust rating must meet or exceed the original, and mounting dimensions — flange pattern, shaft diameter, screw pitch — must be identical. A motor with the right voltage but wrong mounting flange is useless.
Five rules for buying actuator parts:
- Match voltage, force, and speed specifications precisely — “close enough” isn’t.
- Verify mounting dimensions and connector compatibility before ordering — photos and caliper measurements beat catalog descriptions.
- Check material quality: POM/Delrin gears (white, semi-translucent, hard) outperform generic nylon (milky white, softer — you can dent it with a fingernail). Stainless steel lead screws resist corrosion better than carbon steel.
- Ask the supplier for test reports — a reputable vendor can provide inspection data for motors and gear sets.
- Confirm warranty terms — parts with zero warranty are a red flag.
Avoid the cheap replacement trap. A $20 generic motor that burns out in three months costs more than an $80 OEM-spec motor that lasts two years, once you factor in repeat downtime and labor. Price matters, but so does total cost of ownership.
Preventative Maintenance: Keep Your Actuator Running Longer
The best repair is the one you never need. A weekly five-minute inspection prevents roughly 80% of catastrophic actuator failures — the kind that shut down equipment without warning and force emergency repairs.
| Maintenance Task | Frequency | How To Do It | Risk If Skipped |
|---|---|---|---|
| Visual inspection | Weekly | Check for housing cracks, frayed cables, loose mounting bolts, and corrosion on connectors | Undetected cable damage leads to shorts; loose bolts cause misalignment |
| External cleaning | Monthly | Blow out dust with compressed air; wipe the housing with a dry or slightly damp cloth. Keep moisture away from electrical connectors and breather vents | Dust accumulation insulates heat; moisture ingress corrodes internal electronics |
| Lead screw lubrication | Every 500 hours or quarterly | Apply lithium-based grease to the screw along its full travel length. Run the actuator through one full extension-retraction cycle to distribute evenly | Dry screws create friction, heat, and accelerated wear on both screw and nut |
| Electrical connector check | Quarterly | Unplug and inspect each connector for green corrosion, burnt pins, or loose crimps. Apply dielectric grease to exposed contacts in humid environments | Corroded connectors increase resistance → voltage drop → motor underperformance or controller fault |
| Limit switch test | Quarterly | Run the actuator to both end stops and verify it cuts off cleanly at the expected positions. Mechanical limit switches can drift 1–3mm over time with frequent cycling | Failed limit switches cause over-travel, potentially stripping gears or bending the lead screw at end stops |
| Alignment verification | Every 6 months | Fully extend the actuator and sight down the rod axis. Confirm the mounting points, rod, and load path form a straight line | Side loading is the number one cause of premature bearing, seal, and lead screw failure |
A note on lubricants: avoid WD-40 and similar penetrating oils on lead screws. They’re solvents masquerading as lubricants — they strip away existing grease and evaporate within days, leaving the screw drier than before. Use purpose-formulated lithium grease instead.
Match your maintenance schedule to the operating environment. Actuators in dusty, wet, or high-cycle applications need more frequent attention. Check the actuator’s IP rating: IP54 handles splashes but not hose-downs; IP65 survives low-pressure washdown; IP67 can handle temporary submersion. If your environment is harsher than your actuator’s rating, protective boots or enclosures are the first upgrade to make.
Think of preventative maintenance the way you think about changing your car’s oil — five minutes of routine attention that prevents a $500 repair bill. For a linear actuator, that trade-off is just as real.
References:
1. Accelerate Net Zero. “Actuator Repair Cost: Typical Prices to Fix an Industrial or Automotive Actuator 2026.” acceleratenetzero.com
2. Venture Manufacturing Co. “Linear Actuator Troubleshooting Guide.” venturemfgco.com
3. Tolomatic. “Common Causes of Electric Actuator Failure and How to Avoid Them.” tolomatic.com
4. Progressive Automations. “How to Repair and Replace Parts for Your PA-14.” progressiveautomations.com
5. Hoodland. “Electric Actuators.” thehoodland.com
6. Hoodland. “Quality Assurance.” thehoodland.com
7. Hoodland. “Contact Us.” thehoodland.com